This year as we’ve ended January 2021, we will soon be “off to the races” here in USDA Plant Hardiness Zone 6 or 7 dependent on which version of map you are using. This means that I have an Extreme minimum temperature range of -10 to +10 degrees Farenheit (20 degree swing), making my average frost date “somewhere” between March 22nd and April 21st. A whole month of worrying about whether or not what I plant will survive, but that is not what we will be discussing this article (just means that my 8-12 weeks before last frost, may mean that I am behind in my seed starting come January 1st). What I can get done is bed maintenance and creating new gardens altogether, and that brings us to what we will discuss now Sheet Mulched gardens (sometimes referred to as a “Ruth Stout”, “Back-to-Eden”, “Lasagna”, or “No-Dig” methods).
Now with that said, I have installed a new 7’x8’ Sheet Mulched hybrid garden. I say Hybrid because it will end as a raised bed garden, but will built and managed with a mix of “Lasagna”, “Ruth Stout”, and “No-Dig” garden ethos.
I will also be bringing you (in February) “how to” projects on growing in 5-gallon buckets for those with limited space. So, stay tuned for that.
Let’s get into the Sheet Mulched garden beds build. The question is “Why would you make a garden with this method when you have the ground to make into a garden?” Well there are several answers:
Ease of gardening – Sheet Mulched gardens are easier to maintain (no tilling and less weeding) then a normal garden.
Viability of soil – As like last time with raised beds some soils are not suitable for vegetable gardening due to composition or contamination. In cases of contamination, you will want to grow in raised beds and place a barrier in the bottom to prevent your vegetables roots from growing into and absorbing the contaminated soil. In my case the soil is comprised of rocks and clay making the ground hard and un-workable.
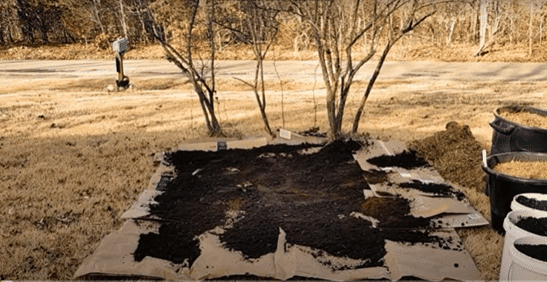
In this first picture (above) you can see the basic foundation of the Sheet Mulched garden. I started with cardboard and old paper feed sacks that I laid on top of the grass and weeds as a barrier that will kill off the grass and eventually decompose into the soil. On top of that I spread some used coffee grounds (approximately three 5-gallon buckets worth) I got from my local coffee shop (most coffee shops will give you all the coffee grounds you could ever want if you ask, I also provide a 5-gallon bucket with a lid and a pick-up service once a week). You do not have to have coffee grounds for this, but since I had them, I added them.
In picture two (above) you see a layer of horse manure has been added, any type of manure can be added as long as it has been “aged” or “composted” to remove excess nitrogen. Fresh manures have high nitrogen content (usually from being exposed to urine) that will chemically “burn” your plants roots and kill them off. In the case of the horse manure I used, it had been sitting in a vacant stall for nearly a year before I went in and cleaned the stall (for payment….I got to keep the poop for my gardens). Even if you do not have “livestock” many who do will gladly share the wealth with you, especially if you volunteer to help clean it up.)
Here in picture three (above) you can see that I have added a third layer to our “lasagna” garden. This layer is mainly comprised of compost. In this instance it is mainly composted wood chips. This layer is where we will place seeds or transplant into when we begin planting in the spring. It is important that a compost or topsoil layer be one of the last layers on your Sheet Mulched garden as it will be the main planting “zone” during the first year of this garden.
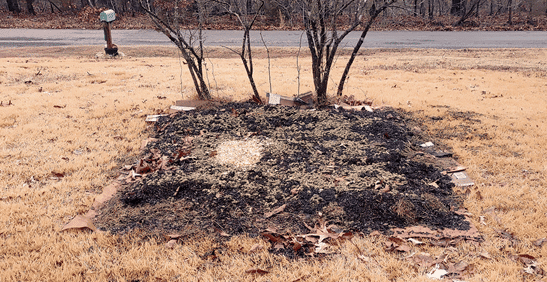
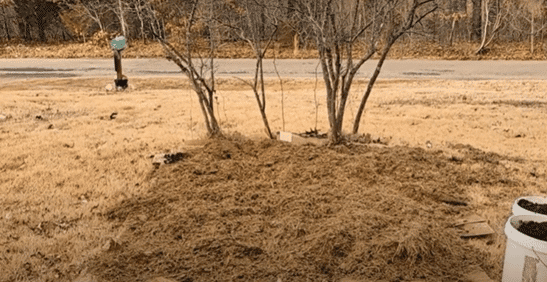
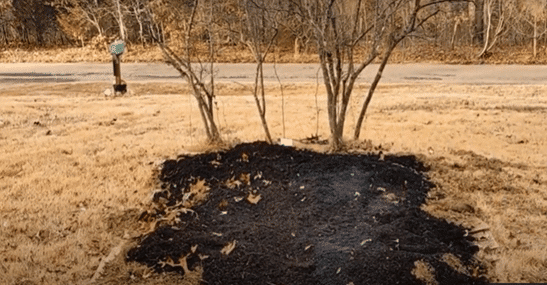
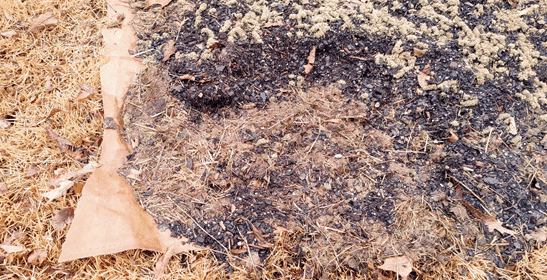
Here in pictures four and five (above) you can see that I have gotten sneaky and added a layer of alfalfa pellets and a small amount of quail bedding/droppings (I had leftovers from adding to the raised beds).
Picture four is the dry pellets before rain. Picture five is after a good hard rain where the pellets have expanded and started to break down. I use alfalfa pellets as a slow-release all-natural fertilizer, the draw-back is that if you spread them on the garden and it does not rain, or you do not “water them in”, you have potential to invite rabbits and deer into the garden…both like the taste of dry alfalfa pellets (but if the time of year is right and you have a license, Rabbit or venison stew is mighty tasty when made with veggies grown in your own garden. Alfalfa pellets are not required for your Sheet Mulched garden but if you do add some (to any garden) three pounds for every 100 square feet (10’x10’ area) will be an appropriate amount and will add NPK [nitrogen – phosphorus – potassium] in a ratio of 2.5-0.5-2.5.
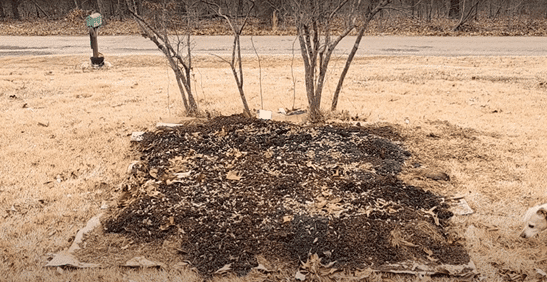
In picture six (above) you can see the four layers of the Sheet Mulch garden, at this point you can repeat layers two, three, and four as much as you like making the garden deeper and deeper (I would suggest only repeating this in a raised bed) until you have the desired depth of the garden.
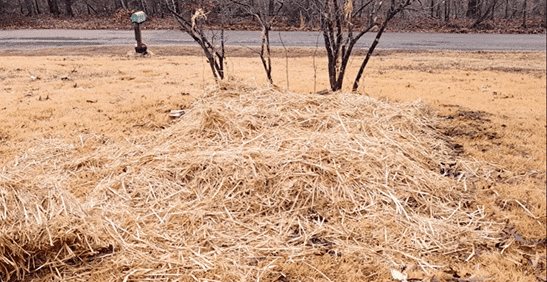
Here in picture seven (above) I have added approximately three-fourths of a bale of straw as the “final” layer of the Sheet Mulched garden. This is the “protection” layer for the garden that prevents many weeds and helps to retain moisture beneath, lowering the need for watering and helping to stabilize the amount of water available to your plants (inconsistent watering results in inconsistent harvests).
This “final” layer is also the starting point of a “Ruth Stout” or “No-Dig” garden when you use Straw or Hay. From this point forward you will add 4” to 12” of Straw or Hay every fall, and make holes in that “mulch” layer in the spring only to plant your new crops. In the “Back-to-Eden” version of Sheet Mulched Gardens, a 6” to 8” of wood chips is added as the final layer, only being disturbed in the spring when a hole is made in the “mulch” layer to plant your new crops. Wood chips break down slowly so you may be able to go several years before you need to “top up” your wood chips back to a 6” to 8” layer.
Both ways have pros and cons, mainly in material handling, every year will require new Straw/Hay in the “Ruth Stout” type of garden. Whereas, every spring you will have to move large areas of wood chips to provide a space for your small seedlings (Larger seedlings can “push” through a layer of Straw/Hay, but cannot lift up and through the heavier wood chips. Small seedlings will need the upper layer of “mulch” removed regardless of what is used)
Special note… make sure the Compost, Manure and any Straw is from a reputable source, in recent years they have been found to have broadleaf herbicides “Picloram, Clopyralid or Aminopyralid” contained within (hay is often made with clover and alfalfa and is less likely to have an herbicide). These compounds have been found to NOT breakdown in an animal’s digestive tract or in a compost pile and can remain for years. So far, the “easiest” way to remediate soil that has been contaminated with these compounds is growing “grass” based grains to absorb the contaminants and then removing the plants from the property, or allowing earthworms and nematodes to work over the area for multiple years before it is “safe” for “broadleaf” plants. To learn more about these herbicides here is a link: https://www.the-compost-gardener.com/picloram.html
Special Note: If you plan on growing potatoes in a “Ruth Stout” or “No-Dig” style of garden with either Straw or Hay, all you need to do is place the seed potato just below the “mulch” and then cover with the same “mulch”. The potatoes are strong enough to push through the Straw/Hay, but will struggle with wood chips. I also suggest that you grow a “Determinate” variety of potatoes that does not require hilling and will produce all the tubers on one “level” usually the area between the “soil” and “mulch” (the roots grow down into the soil, the tubers grow to the sides, and the leafy bits grow up through the “mulch”
As a last tip Mulch, Mulch, Mulch….That is after all the basic concept of all of these gardens (“Ruth Stout”, “Back-to-Eden”, “Lasagna”, or “No-Dig”). As the years pass the “mulch” breaks down into soil and this new soil will get deeper and deeper, as long as you keep a good deep mulch on top.


